To balance the rig better, we tried a laser 4.7 rig at the back.
For those unfamiliar with this rig, it uses a shorter bottom section of mast, with a slight bend to put the centre of effort of the smaller sail in the same place as the normal one, when used on a laser. That's why it's tipping back. It looks a bit silly and I should move the mast foot to keep the masts parallel, but it worked.
We had a nice sunny day with the force 3 that's typical summer weather at our lake, with a few gusts up to force 4. Liz's boyfriend Mathew joined us, which I think is only his second time sailing. With an extra willing pair of hands, carrying everything down to the beach and rigging up went faster than usual and we were soon afloat and chasing a Laser2000 that was the only other boat out. Most of the time we were similar speeds, in the gusts we were slightly faster but he was much faster to tack.
We discovered that I could cleat off the aft sheet and Liz could balance the sails and even steer with the fore sheet, leaving the steering oar for when we needed to steer quickly or tack. Mostly we'd tack without the oar, just letting the fore sail go and allowing the boat to round up into the wind, then backing it to force the nose around. Backing both sails on opposite sides also spun the boat usefully but we didn't usually bother.
I could speed things up with a few strokes of the oar but it wasn't really necessary. Using the oar to steer around a tack required it to be on the right side, and it's quite unwieldy to move around so I mostly left it on one side. It could still be used very usefully to row the boat around once we'd slowed down. The oar isn't as good as a rudder for normal sailing. While it is now quite powerful and precise, and doesn't twist or bend (much), the handle end is at about shoulder height and can catch on the boom. When I was standing up in the aft cockpit it feels great. When I was sitting on the hiking bench or safety ama I could still reach but it's a bit high for comfort and I don't have the range of movement that I'd have with a tiller extension. That said, the ability to scull, and to row the boat in a circle are huge benefits that I wouldn't have with a rudder.
I'd made a new off-centre board from 2x4s, cut in half to make 2" blocks, planed smooth, switched around to alternate the grain direction and spread the knots around, epoxied and shaped with an electric plane. Other build-logs make this sound like a huge amount of work - maybe they used a hand plane because it only took an hour or so to form the aerofoil shape. It did generate a huge amount of wood shavings though - I filled my 50lt dust collector and blocked the hose a few times. The finished board is about 40mm thick in the middle and feels immensly strong so I see no need to glass it, just a coat of Woodskin. I turned the old steering oar into a second paddle and Woodskinned the steering oar. Did I meantion that I love Woodskin?
It's hard to say how effective the centreboard is, but there's clearly a fair bit of force on in when we're sailing so it must be working! Putting it down when it's to windward was tricky as its handle wanted to jam under the gunwale. I had to put my foot on the far end of the board and push it down and under the boat, which created a lot of spray and a noticeable amount of drag. Once down, this board created a lot less spray than the old one.
Back to the sailing: we tacked up to the top of the lake and then goosewinged back down for lunch. Running with this rig was lovely, fast and effortless. The two different sized sails didn't quite balance and needed a small amount of correction from the steering oar. We tried putting more weight on the ama side but it didn't help much - I'm surprised how little drag the ama has, even with 3 meters of leverage. Liz tried to balance the boat with the ama flying, so we alternated between dragging the ama, flying it, and dragging the safety ama for a while, but there was very little affect on the steering. Surprising, but nice.
After lunch the wind had risen a bit and we needed two people on the hiking seats to stay level, and the safety ama saved us several times. There's no warning when the ama lifts unless you're actually watching it or watching for gusts. It's quite a gentle process, taking about a second from the sudden quiet as the ama leaves the water to the safety ama touching down on the other side. Initially the safety ama rides along smoothly, but as it gets deeper it splashes more.
Here are a couple of short video clips that Mathew took:
https://youtu.be/zl5cHORcUcs
https://youtu.be/EUeRqE9pf1w
Sunday, 4 June 2017
Sunday, 28 May 2017
New steering oar, an AD scull.
We had another sail today, in a very light wind.
Initially there was no wind and we went out with no rigs. The new paddle worked well, moving the boat at a pretty good speed, even with just one person paddling. I'll have to make some more because I'd love to see how it goes with four people paddling. We paddled and sculled across across the lake and back (total about a mile and a half) pretty easily.
I had made a 12 foot steering oar (it was originally 13 foot, but I had to cut it down to fit in our van) with an asymetric blade, based on the 'AD scull' idea but largely guesswork because I couldn't much information. My new rowlocks are apparently slightly different sizes, because the oar was a nice snug fit in one, but too tight in the other and wouldn't rotate, so I could only scull when the oar was on one side. I found sculling to be quite natural and very quick to learn and about as fast as paddling but with much better steering control. I tried rigging up a line to hold the front of the oar down and sculling with one hand on the line, but didn't find it useful. There wasn't much force on it, and it didn't seem to help control the angle of the blade - maybe there are subleties I've missed.
Later a light wind arrived and we put up the sails, this time with kickers on both sails. There was still a little weather helm, even with the fore sail over sheeted and aft sail eased a little - however it was easily overcome with the steering oar, or just by moving to the aft cockpit. Here are a couple of short video clips, showing how the two sails push us along at quite a reasonable speed in almost no wind.
https://www.youtube.com/watch?v=3ALma58dqew
https://www.youtube.com/watch?v=KRgtCrqZUpE
I've made a new, much stronger centreboard, but the old pivot bolt is too short so we were sailing without it today.
Finally, here's a short clip of us playing with the new safety ama, experimenting to see if we could use it to tack the boat. Tipping the boat didn't really affect its course, and left me a bit trapped behind the sail, so we won't be doing this regularly. It is however a good demonstration of how gently it settles into the 'tipped' position, and how much buoyancy there is.
https://www.youtube.com/watch?v=yqlkUDq1a9U
We also checked that we can both stand on it without sinking it.
Initially there was no wind and we went out with no rigs. The new paddle worked well, moving the boat at a pretty good speed, even with just one person paddling. I'll have to make some more because I'd love to see how it goes with four people paddling. We paddled and sculled across across the lake and back (total about a mile and a half) pretty easily.
I had made a 12 foot steering oar (it was originally 13 foot, but I had to cut it down to fit in our van) with an asymetric blade, based on the 'AD scull' idea but largely guesswork because I couldn't much information. My new rowlocks are apparently slightly different sizes, because the oar was a nice snug fit in one, but too tight in the other and wouldn't rotate, so I could only scull when the oar was on one side. I found sculling to be quite natural and very quick to learn and about as fast as paddling but with much better steering control. I tried rigging up a line to hold the front of the oar down and sculling with one hand on the line, but didn't find it useful. There wasn't much force on it, and it didn't seem to help control the angle of the blade - maybe there are subleties I've missed.
Later a light wind arrived and we put up the sails, this time with kickers on both sails. There was still a little weather helm, even with the fore sail over sheeted and aft sail eased a little - however it was easily overcome with the steering oar, or just by moving to the aft cockpit. Here are a couple of short video clips, showing how the two sails push us along at quite a reasonable speed in almost no wind.
https://www.youtube.com/watch?v=3ALma58dqew
https://www.youtube.com/watch?v=KRgtCrqZUpE
I've made a new, much stronger centreboard, but the old pivot bolt is too short so we were sailing without it today.
Finally, here's a short clip of us playing with the new safety ama, experimenting to see if we could use it to tack the boat. Tipping the boat didn't really affect its course, and left me a bit trapped behind the sail, so we won't be doing this regularly. It is however a good demonstration of how gently it settles into the 'tipped' position, and how much buoyancy there is.
https://www.youtube.com/watch?v=yqlkUDq1a9U
We also checked that we can both stand on it without sinking it.
Saturday, 13 May 2017
First sail of the full size Wa'apa
Today we made it onto the water with the new middle section (making 24 foot), extended trailer, safety ama and twin laser rigs.
The reshaped steering oar was a big improvement, removing all the twisting force and making steering much easier - but it's much too short, I had to sail from the rear cockpit to reach the rowlocks, which meant I couldn't help balance the boat. It also bends alarmingly - I need to beef it up, and maybe cut it down to be an ordinary paddle.
Tacking with two sails was a huge improvement, over both the single laser rig and shunting the crab claw rig. We'd sheet in just the rear sail to head up, then when almost head to wind Liz would back the foresail to push the bow around, then sheet it in to bear away. We did some tacks without the steering oar but found the oar useful on the tacks that put the ama out the outside of the turn. Occasionally we picked up quite a bit of speed in reverse but backing both sails on opposite sides still turned the boat with ease.
The new beam lashing arrangement worked well, saving lots of time at the start and end of the day. One end of the rope is attached to a hole in the seat, the turns just go around blocks on the outside of the boat (no more fiddly holes) and the running end is secured to a cleat (no more dodgy knots). It's just about visible in the picture above.
More seriously, the rigs aren't balanced. I couldn't apply much power with the aft sail without the boat heading up into wind. This meant I needed the oar to keep us straight, and thus needed to stay in the aft cockpit to give the oar something to lever against. It's possible that this is just because we didn't have a kicker (vang) on the front rig, or we may have to try a smaller sail at the rear (laser 4.7, maybe even an optimist rig!). Moving the rigs forward would involve a hole in the forward watertight compartment, and moving the centreboard would mean not using the nice reinforced pivot I've built in the middle of the boat, and possibly drilling a number of holes the find the right spot.
Anyway, we had a blast and have a fresh set of problems to solve.
Here's a picture of the boat on it's trailer, with the safety ama on top - pretending it's a much bigger boat with a cabin.
The trailer worked well, but doesn't have a lot of ground clearance at the back. The lighting board was knocked off when we hit a rock in the roughest part of the track in the dinghy park.
Things that went well
Today's wind started at a force 4 and now we have twice the power we were going pretty quickly but it was a bit too much for Liz to balance on her own. The safety ama saved us several times, touching down in a very smooth, progressive way and giving us plenty of time to release the sheets. Unlike the drain pipe, there's no great explosion of spray and reduction of speed when it hits the water. I'm very happy with it. It's nice and light to move around too.The reshaped steering oar was a big improvement, removing all the twisting force and making steering much easier - but it's much too short, I had to sail from the rear cockpit to reach the rowlocks, which meant I couldn't help balance the boat. It also bends alarmingly - I need to beef it up, and maybe cut it down to be an ordinary paddle.
Tacking with two sails was a huge improvement, over both the single laser rig and shunting the crab claw rig. We'd sheet in just the rear sail to head up, then when almost head to wind Liz would back the foresail to push the bow around, then sheet it in to bear away. We did some tacks without the steering oar but found the oar useful on the tacks that put the ama out the outside of the turn. Occasionally we picked up quite a bit of speed in reverse but backing both sails on opposite sides still turned the boat with ease.
The new beam lashing arrangement worked well, saving lots of time at the start and end of the day. One end of the rope is attached to a hole in the seat, the turns just go around blocks on the outside of the boat (no more fiddly holes) and the running end is secured to a cleat (no more dodgy knots). It's just about visible in the picture above.
Things that didn't
There was a nasty splintering sound almost as soon as we powered up, and the centreboard folded at it's pivot. I couldn't see any signs of rot, I think we just expected too much from half inch plywood. It even broke the two inch thick handle that was supposed to reinforce the pivot! Fortunately we didn't really miss it as we were just reaching back and forth.More seriously, the rigs aren't balanced. I couldn't apply much power with the aft sail without the boat heading up into wind. This meant I needed the oar to keep us straight, and thus needed to stay in the aft cockpit to give the oar something to lever against. It's possible that this is just because we didn't have a kicker (vang) on the front rig, or we may have to try a smaller sail at the rear (laser 4.7, maybe even an optimist rig!). Moving the rigs forward would involve a hole in the forward watertight compartment, and moving the centreboard would mean not using the nice reinforced pivot I've built in the middle of the boat, and possibly drilling a number of holes the find the right spot.
Anyway, we had a blast and have a fresh set of problems to solve.
Other thoughts
I also spent a while sailing the clubs training dinghys for our open day, and it was an interesting comparison. The Wa'apa was very dry to sail, while the Wayfarer smashed into every little wave and sent sheets of spray over the crew. It was fast but also very relaxed without every gust or lull tipping the you over (although not relaxed enough to take photos - the oar is a two handed job!) It's also very light - I could move it around on our little dolly on my own, even on a slope with slightly soft tires.Here's a picture of the boat on it's trailer, with the safety ama on top - pretending it's a much bigger boat with a cabin.
The trailer worked well, but doesn't have a lot of ground clearance at the back. The lighting board was knocked off when we hit a rock in the roughest part of the track in the dinghy park.
Friday, 5 May 2017
Spring update
Spring is finally here, and while we've not had much nice sailing weather, it's time to get ready for the season. Building the middle section of the boat was only a fraction of the work that is required to actually sail it. I really want to try sailing a two masted boat, so I plan to use two laser rigs. One will go in the mast step and partner that I used in the 16' boat, and another will go in a new step and partner somewhere in the middle section. So I've made those, and another mast extension.
The spare step is so I can rig the boat with a single sail, for when it's really windy.
As we capsized a few times last year, and the drain pipe didn't have enough buoyancy to support us, I've built a 'safety ama'. This will slip onto the ends of the beams on the side opposite the existing ama. It won't touch the water unless we're about to capsize. It's made from a single 8x4' sheet of 6mm exterior ply and should have over 200 litres of buoyancy. The edges are all covered in glass tape and epoxy. It would have been much easier to build if only the bottom was cuved, but I've curved the 'outside' too. This meant that the beam sockets had to stick out, and one seam has a tricky double curve but I think it looks better and heopfully there will be less slamming and splashing when it hits a wave. Here it is, in front of the rest of the boat, which has spend the winter stacked up in my garage.
Also in the photo is the modified steering oar - I've removed half of one side to make it more balanced. That might sound wrong but the centre of pressure of an aerofoil is 25-33% back from the leading edge. It may need a bit more off because it sits at an angle in the water. It probably also needs to be about a meter longer and have a thicker shaft but I want to get the blade shape right before building another. Another minor improvement is some proper rowlocks for the steering oar. The 'two peg system' I used last year limited the steering angle and nearly broke a few times.
Next to the steering oar is a paddle - I had been using paddles that I made (rather crudely) a few years ago for children in Optimists but they were a bit short, had small blades and had been left out in all weathers. This one might be too big, but like the steering oar, I can always cut it down.
A longer boat needs a longer trailer. I'd picked a trailer that used a scaffold pole for it's spine, so it was relatively easy to fit a longer pole. I say 'relatively' because while it's easy to buy scaffolding on-line, the postage on a 21' steel pole is ten times the price of the pole - no wonder they sell them in packs of 100! Eventually I found a local company who would sell me one of theirs and deliver it when they were passing - thanks Worth Scaffolding! The diagonal braces were looking a little rusty, so I replaced them with some much beefier scaffold tubes that will also support a wooden bearer for the boat. Here's a picture of it as we were building it, looking comicly out of proportion due to our camera's wide angle lens.
Another 'little' job was extending the boat cover - unpicking about 5 meters of stitching and sewing a new panel in the middle. Now I'm just waiting for a few odds and ends and we're ready to get back on the water.
The spare step is so I can rig the boat with a single sail, for when it's really windy.
As we capsized a few times last year, and the drain pipe didn't have enough buoyancy to support us, I've built a 'safety ama'. This will slip onto the ends of the beams on the side opposite the existing ama. It won't touch the water unless we're about to capsize. It's made from a single 8x4' sheet of 6mm exterior ply and should have over 200 litres of buoyancy. The edges are all covered in glass tape and epoxy. It would have been much easier to build if only the bottom was cuved, but I've curved the 'outside' too. This meant that the beam sockets had to stick out, and one seam has a tricky double curve but I think it looks better and heopfully there will be less slamming and splashing when it hits a wave. Here it is, in front of the rest of the boat, which has spend the winter stacked up in my garage.
Also in the photo is the modified steering oar - I've removed half of one side to make it more balanced. That might sound wrong but the centre of pressure of an aerofoil is 25-33% back from the leading edge. It may need a bit more off because it sits at an angle in the water. It probably also needs to be about a meter longer and have a thicker shaft but I want to get the blade shape right before building another. Another minor improvement is some proper rowlocks for the steering oar. The 'two peg system' I used last year limited the steering angle and nearly broke a few times.
Next to the steering oar is a paddle - I had been using paddles that I made (rather crudely) a few years ago for children in Optimists but they were a bit short, had small blades and had been left out in all weathers. This one might be too big, but like the steering oar, I can always cut it down.
A longer boat needs a longer trailer. I'd picked a trailer that used a scaffold pole for it's spine, so it was relatively easy to fit a longer pole. I say 'relatively' because while it's easy to buy scaffolding on-line, the postage on a 21' steel pole is ten times the price of the pole - no wonder they sell them in packs of 100! Eventually I found a local company who would sell me one of theirs and deliver it when they were passing - thanks Worth Scaffolding! The diagonal braces were looking a little rusty, so I replaced them with some much beefier scaffold tubes that will also support a wooden bearer for the boat. Here's a picture of it as we were building it, looking comicly out of proportion due to our camera's wide angle lens.
Another 'little' job was extending the boat cover - unpicking about 5 meters of stitching and sewing a new panel in the middle. Now I'm just waiting for a few odds and ends and we're ready to get back on the water.
Sunday, 16 October 2016
Middle section complete
It's slightly too late for the sailing season, but I've finished the middle section and now have a 24' wa'apa.
Here it is, assembled for the first time in my garden.
I made all four bulkheads at the same time, so all three parts line up well despite not having the ends for reference when I glued the centre section together.You can see the reinforcement for the leeboard in the above picture - the bolt goes through the central frame, which is also reinforced.
I think I need a longer, stronger steering oar but can reuse the bracket I made earlier. It should lash to the holes where the aka used to go, where it is in these pictures (but straight)
The aka lashings are copied from Mr D's later design, 'Tamanu'. I remove the akas for storage, and threading the lashings though holed in the gunnels is quite fiddly - and threading them through holes in a seat would be worse (it's bad enough with the mast partner I added). This way I can just wind the lashing around a block. The construction was slightly complicated by the block being split between two parts of the hull, and having to interrupt the gunnel but I think it'll be well worth it. I'm still undecided about using cleats to finish the lashings.
Right now, it's all in my garage, ready for another coat of International Woodskin. Some parts didn't get the recommended 3 coats last year but have held up very well. I really like how it copes with the wear and tear of lashing wooden parts together, something that would be a real problem for paint or varnish. After that, I'll need to extend the cover and trailer, and build a second laser mast step and partner, and maybe a safety ama and some buoyancy bags, because we're bound to capsize a few times with that much power.
Here it is, assembled for the first time in my garden.
I made all four bulkheads at the same time, so all three parts line up well despite not having the ends for reference when I glued the centre section together.You can see the reinforcement for the leeboard in the above picture - the bolt goes through the central frame, which is also reinforced.
I think I need a longer, stronger steering oar but can reuse the bracket I made earlier. It should lash to the holes where the aka used to go, where it is in these pictures (but straight)
The aka lashings are copied from Mr D's later design, 'Tamanu'. I remove the akas for storage, and threading the lashings though holed in the gunnels is quite fiddly - and threading them through holes in a seat would be worse (it's bad enough with the mast partner I added). This way I can just wind the lashing around a block. The construction was slightly complicated by the block being split between two parts of the hull, and having to interrupt the gunnel but I think it'll be well worth it. I'm still undecided about using cleats to finish the lashings.
Right now, it's all in my garage, ready for another coat of International Woodskin. Some parts didn't get the recommended 3 coats last year but have held up very well. I really like how it copes with the wear and tear of lashing wooden parts together, something that would be a real problem for paint or varnish. After that, I'll need to extend the cover and trailer, and build a second laser mast step and partner, and maybe a safety ama and some buoyancy bags, because we're bound to capsize a few times with that much power.
Sunday, 4 September 2016
A minor update
We went for another sail today after making a few minor changes to the rig (which always seem to take ages and result in tangles). I added small blocks to the bows for the backstays to reduce friction, and stretched the backstay bungies all the way to the opposite bow to take up all the slack. This made shunting a lot easier, as the slack used to get caught around the boom jaws. The bungies still aren't powerful enough to lift the rig when the tack line is released but it's a lot easier than it used to be to pull a backstay to position the mast.
The next step is another length of bungy; the book mentions 3 lengths of 6mm, so I'd hoped that 9mm would be sufficient, but I guess not. We still have to be careful how we handle the sail during a shunt. It's easy to spend too much time getting tangled and not notice the boat spinning into the wind. It's too easy to be standing on the mainsheet, or the wrong side of the tack line and end up in a mess.
Here's another short video of us sailing: https://youtu.be/1nqyQFIQIgI
Meanwhile, I've started building the middle section. It feels much faster than the bow sections. Maybe I'm getting better, maybe it's easier or maybe it's because there's only one of them...
The next step is another length of bungy; the book mentions 3 lengths of 6mm, so I'd hoped that 9mm would be sufficient, but I guess not. We still have to be careful how we handle the sail during a shunt. It's easy to spend too much time getting tangled and not notice the boat spinning into the wind. It's too easy to be standing on the mainsheet, or the wrong side of the tack line and end up in a mess.
Here's another short video of us sailing: https://youtu.be/1nqyQFIQIgI
Meanwhile, I've started building the middle section. It feels much faster than the bow sections. Maybe I'm getting better, maybe it's easier or maybe it's because there's only one of them...
Sunday, 17 July 2016
First outing with the Crab Claw sail
We spent a couple of hours trying to work out how long all the lines should be, where to attach them and how to adjust them. After the simplicity of just plonking in a laser rig, it seemed pretty complex with lines everywhere all only a vague idea what it was supposed to look like.
Then we went for a sail to try it, and even managed to take some short videos.
https://youtu.be/lR_2MyIq5xc
https://youtu.be/RVYTApxmJw0
https://youtu.be/Q0LVeRyGtbM
I forgot to take any photos though.
It's a very different experience to the laser rig, in several ways.
Then we went for a sail to try it, and even managed to take some short videos.
https://youtu.be/lR_2MyIq5xc
https://youtu.be/RVYTApxmJw0
https://youtu.be/Q0LVeRyGtbM
I forgot to take any photos though.
It's a very different experience to the laser rig, in several ways.
- The boat doesn't feel stressed, even in gusts that would have had the laser mast groaning in it's socket. The shroud and backstay take all the load, so there's very little no load on the beams or twisting the hull. A 2:1 mainsheet was easy to hold and a lot of the time we just held both parts.
- There's no need to tack or gybe. The long hull with very little rocker doesn't turn easily, and tacking got harder as the wind got stronger. Shunting is still very new to us, and we kept getting tangled, but it felt natural for the boat and there are no large forces involved.
- We didn't need the steering oar. It spent most of it's time bungeed to a hiking bench. The boat would naturally turn towards the wind, or bear away if we pull the sail in harder, which didn't seem to affect the speed - just like it says in the book.
- Hoisting and dropping the sail while afloat was really easy.
- We got taken aback a couple of times and the rig fell down. With the relatively lightweight windsurfer mast spars, this wasn't a big deal. We found it easiest to free the halyard and pull the sail to the mast foot, then the mast could be raised with one hand and the sail hoisted.
- I'd like the sail a little higher on the mast, to move it forwards because the boat wants to turn into the wind a bit too much. That will require a longer shroud and back-stays.
- The tack line is too thin; we're handling it a lot so it needs to be an easy size to grip, not just sized for the relatively light load it carries.
- Bungee powered back-stays sound wonderful - I can't wait to try them.
- Brailing lines, we'll probably need them at some point.
Sunday, 10 July 2016
More sailing and the start of a Crab claw rig
I've had a few good outings with the laser rig, but I really want to try a shunting rig. A force 4 wind is quite an exhilarating sail at the moment, on the 'proa' tack the front of the ama lifts a foot or two out of the water and we fly along effortlessly. There's a little flex in the aka lashings and there must be a little twist in the hull due to the immense load from the unstayed mast (it's imperceptible) at the front and me sitting about a meter out on the hiking bench at the back.
On the 'trimaran' tack the front of the ama punches through waves, seemingly with little resistance, but it sends a bow wave half a meter into the air - and the centre-board also catches the water and sends it's own spray up high. Fortunately these are both to lee of me, so I can admire the view and stay dry. Unfortunately I haven't taken pictures while I'm sailing.
I've tried flying the ama, and while it can be done, it requires a careful balancing act. If I go to high, the part of the boat that's in the water is tilted under me, and there's no going back. The 3m X 100mm safety ama hit the water with a splash but couldn't support my weight, or right the boat on it's own, but it (and the sealed laser mast) did keep the boat on it's side, and make it easy to right, and I bailed it quickly with a big bucket. Since then I've learnt to tie on the hiking seats and to fly no more than half the ama! This limits me to a force 4, unless I've got some crew for extra ballast ;-)
On both tacks, it's easiest to steer the boat by adjusting the position of the centreboard a little. Fully powered up 'rudderless' sailing feels great! This works best when the board is mounted behind the centre-line, so that putting it down causes the boat to bear away and lifting it up makes the boat round up. I guess that means the rig is a little too far back, but it's much easier than steering with the oar! The oar is great for changing course, but hard to hold an out-of-balance boat. The blade floats, so that most of the blade area in the water is below the centre line, which twists it in my hands. I'll add some weight.
Tacking with the oar is a skill that took a while to understand. First I tip the centre-board right up (which involves moving in from the hiking bench, possibly requiring depowering the sail) and then steer hard upwind. As the boat approaches the eye of the wind, I lift the oar out of it's rest and make one big sweep stroke to push the bow through the wind. Then I move to the other side of the boat, passing the oar behind the mainsheet (and usually hitting my head on the boom). Down goes the centre-board and we're off again.
Unless it's a little windier, then I can't steer and sweep-stroke hard enough to get around and we end up going backwards. It should then be possible to do something clever with the oar on the other side, but that risks tipping over.
Gybing is a similar story, in a force 4 we go around in a big, fast arc. It's very noticeable that having the sail a long way from the centre-line turns the boat, so it's important to keep it in tight and flip it over as soon as possible. If it's too windy to beam reach with the sail in tight, it's impossible to gybe - we just ended up on a flying broad reach with the sail right out and the oar straining to counter it.
So the obvious solution is to sail this boat the way the polynesians did, with a shunting rig. No more tacking and gybing, a shroud to take the load from the sail, and the promise of being able to steer by over-sheeting the sail. I have three old glass/expoy windsurfing masts from a nice chap who was upgrading to carbon masts, a mast foot he also didn't need, and I've made a selection of things to fit in the ends of the mast.

From left to right, the boom jaws (a crude gooseneck), the mast head, the yard tack, the yard head and the boom clew. The first three were carved from an old hard wood doorstep, the last two from an old fence post. I used an 'eight siding gauge' (mine is too crude for a photo, just a bit of wood with two nails and two screws, but it's very satisfying to use) and lots of rasping and sanding.
I put a sheave in the mast head so I could adjust the height of the yard, but then I realised that the shroud and back stays need to attach to the mast at the same height as the yard or there will be a big bending load on the mast. Then I thought I could make a sliding collar where they'd all be attached, but the shroud and stays would have to be adjusted every time it was moved, and I'm pretty sure the mast needs to stay up while I hoist the yard.
I realise that I'm making things difficult for myself here by not following the plans exactly, but the book only has a 5 square meter sail and I've got used to power of the 7 meter laser sail. Hopefully it'll just take a bit of trial and error to work out where everything needs to go, but it really feels like uncharted territory not having measurements for everything I need to make.
In a similar vein, I thought it best to make a practice sail from an old plastic tarp. It's a good thing I did, because sewing is harder than it looks! Here's a close-up of the clew, showing how much I struggled to keep and even speed through the machine, my wonky lines and the number of times the thread broke.

The good news is that even a pretty basic, 45 year old machine has no problems with at least 6 layers of tarp and two layers of nylon webbing.
On the 'trimaran' tack the front of the ama punches through waves, seemingly with little resistance, but it sends a bow wave half a meter into the air - and the centre-board also catches the water and sends it's own spray up high. Fortunately these are both to lee of me, so I can admire the view and stay dry. Unfortunately I haven't taken pictures while I'm sailing.
I've tried flying the ama, and while it can be done, it requires a careful balancing act. If I go to high, the part of the boat that's in the water is tilted under me, and there's no going back. The 3m X 100mm safety ama hit the water with a splash but couldn't support my weight, or right the boat on it's own, but it (and the sealed laser mast) did keep the boat on it's side, and make it easy to right, and I bailed it quickly with a big bucket. Since then I've learnt to tie on the hiking seats and to fly no more than half the ama! This limits me to a force 4, unless I've got some crew for extra ballast ;-)
On both tacks, it's easiest to steer the boat by adjusting the position of the centreboard a little. Fully powered up 'rudderless' sailing feels great! This works best when the board is mounted behind the centre-line, so that putting it down causes the boat to bear away and lifting it up makes the boat round up. I guess that means the rig is a little too far back, but it's much easier than steering with the oar! The oar is great for changing course, but hard to hold an out-of-balance boat. The blade floats, so that most of the blade area in the water is below the centre line, which twists it in my hands. I'll add some weight.
Tacking with the oar is a skill that took a while to understand. First I tip the centre-board right up (which involves moving in from the hiking bench, possibly requiring depowering the sail) and then steer hard upwind. As the boat approaches the eye of the wind, I lift the oar out of it's rest and make one big sweep stroke to push the bow through the wind. Then I move to the other side of the boat, passing the oar behind the mainsheet (and usually hitting my head on the boom). Down goes the centre-board and we're off again.
Unless it's a little windier, then I can't steer and sweep-stroke hard enough to get around and we end up going backwards. It should then be possible to do something clever with the oar on the other side, but that risks tipping over.
Gybing is a similar story, in a force 4 we go around in a big, fast arc. It's very noticeable that having the sail a long way from the centre-line turns the boat, so it's important to keep it in tight and flip it over as soon as possible. If it's too windy to beam reach with the sail in tight, it's impossible to gybe - we just ended up on a flying broad reach with the sail right out and the oar straining to counter it.
So the obvious solution is to sail this boat the way the polynesians did, with a shunting rig. No more tacking and gybing, a shroud to take the load from the sail, and the promise of being able to steer by over-sheeting the sail. I have three old glass/expoy windsurfing masts from a nice chap who was upgrading to carbon masts, a mast foot he also didn't need, and I've made a selection of things to fit in the ends of the mast.
From left to right, the boom jaws (a crude gooseneck), the mast head, the yard tack, the yard head and the boom clew. The first three were carved from an old hard wood doorstep, the last two from an old fence post. I used an 'eight siding gauge' (mine is too crude for a photo, just a bit of wood with two nails and two screws, but it's very satisfying to use) and lots of rasping and sanding.
I put a sheave in the mast head so I could adjust the height of the yard, but then I realised that the shroud and back stays need to attach to the mast at the same height as the yard or there will be a big bending load on the mast. Then I thought I could make a sliding collar where they'd all be attached, but the shroud and stays would have to be adjusted every time it was moved, and I'm pretty sure the mast needs to stay up while I hoist the yard.
I realise that I'm making things difficult for myself here by not following the plans exactly, but the book only has a 5 square meter sail and I've got used to power of the 7 meter laser sail. Hopefully it'll just take a bit of trial and error to work out where everything needs to go, but it really feels like uncharted territory not having measurements for everything I need to make.
In a similar vein, I thought it best to make a practice sail from an old plastic tarp. It's a good thing I did, because sewing is harder than it looks! Here's a close-up of the clew, showing how much I struggled to keep and even speed through the machine, my wonky lines and the number of times the thread broke.
The good news is that even a pretty basic, 45 year old machine has no problems with at least 6 layers of tarp and two layers of nylon webbing.
Saturday, 11 June 2016
Trailer, steering oar and other improvements
This winter I've made a few changes to make life easier. The first is a trailer so I don't have to bolt the hull and ama together every time I want to sail. This was rescued from the scrap pile at the sailing club, fitted with new wheel bearings and more proa friendly boat supports (bits of wood and old carpet).
Here it is in 'traveling mode', with everything lashed to the trailer
and here it is in 'storage mode' with everything piled on top. The plastic pipe of the safety ama goes right at the top and supports the cover, which is sown from a plastic tarp. I'm not sure that a large plastic tarp was the best project to learn how to use a sewing machine, as it's slippery when you want it to stay in place, but stiff and heavy when you want to it to feed through the machine - but I've now got a cover that fits (but forgot to take a photo)
Here you can see the giant steering oar I made. It's a bit crude, because I wasn't sure how large it needed to be or what shape to make it.
Here I am, enjoying the English summer weather (rain and almost no wind). I'm grinning because the steering oar and it's support is (as my daughter says) 'super effective'. We can now tack and gybe when we want, and sail where we want to. It's also powerful enough to keep control if you've got four children aboard, all paddling on the same side. The oar support (does it have a name?) is lashed on here, as I wasn't sure if I'd need to adjust it's position.
Also, I've made a small seat to bridge the gap to the plank, and it's great, allowing me to move in and out easily, thus proving that I should have done what it said in the plans in the first place!
Another small improvement is that I removed the captive nuts from the ama and welded the bolts to a square of stainless steel. For some reason captive bolts seem to work much better as I can spin the nuts on by hand, and use an electric screwdriver to tighten them up. I've also made some rubber washers (from an old inner tube) to seal the holes. Now I can put the ama together solidly in a few minutes, rather than struggling for half an hour and sailing with half the bolts a bit loose. Hopefully I won't have to take it apart all summer but it's great to have a connection I can trust.
Here it is in 'traveling mode', with everything lashed to the trailer
and here it is in 'storage mode' with everything piled on top. The plastic pipe of the safety ama goes right at the top and supports the cover, which is sown from a plastic tarp. I'm not sure that a large plastic tarp was the best project to learn how to use a sewing machine, as it's slippery when you want it to stay in place, but stiff and heavy when you want to it to feed through the machine - but I've now got a cover that fits (but forgot to take a photo)
Here you can see the giant steering oar I made. It's a bit crude, because I wasn't sure how large it needed to be or what shape to make it.
Here I am, enjoying the English summer weather (rain and almost no wind). I'm grinning because the steering oar and it's support is (as my daughter says) 'super effective'. We can now tack and gybe when we want, and sail where we want to. It's also powerful enough to keep control if you've got four children aboard, all paddling on the same side. The oar support (does it have a name?) is lashed on here, as I wasn't sure if I'd need to adjust it's position.
Also, I've made a small seat to bridge the gap to the plank, and it's great, allowing me to move in and out easily, thus proving that I should have done what it said in the plans in the first place!
Another small improvement is that I removed the captive nuts from the ama and welded the bolts to a square of stainless steel. For some reason captive bolts seem to work much better as I can spin the nuts on by hand, and use an electric screwdriver to tighten them up. I've also made some rubber washers (from an old inner tube) to seal the holes. Now I can put the ama together solidly in a few minutes, rather than struggling for half an hour and sailing with half the bolts a bit loose. Hopefully I won't have to take it apart all summer but it's great to have a connection I can trust.
Wednesday, 30 September 2015
Mast step redesign
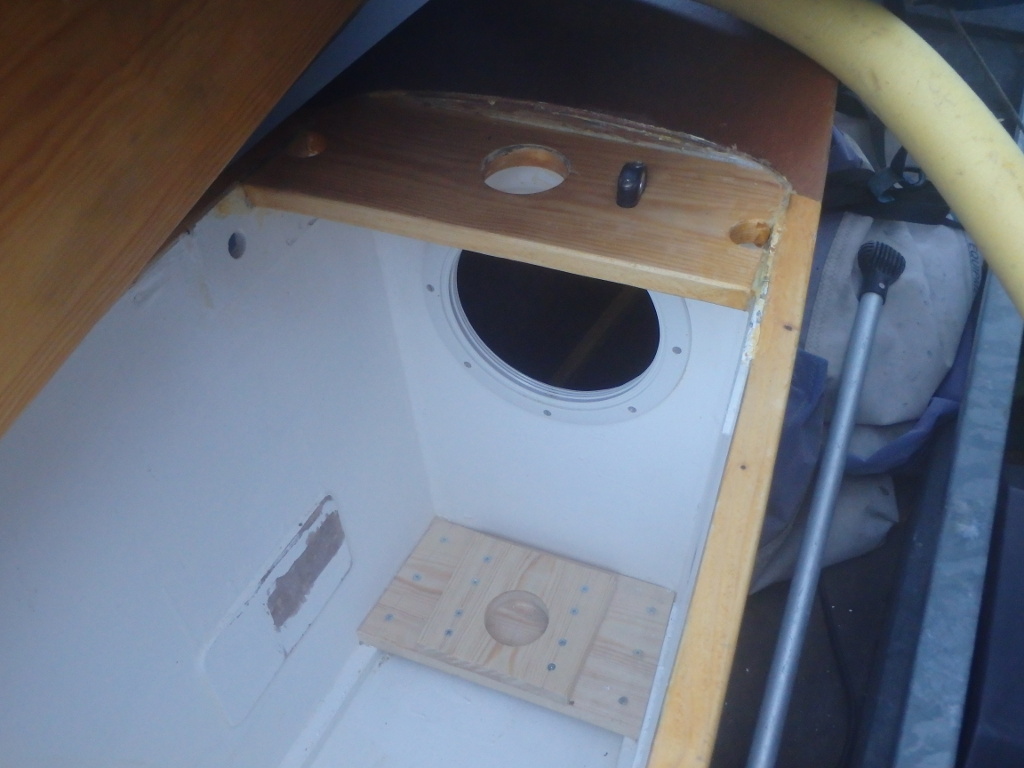
After some good advice I've rebuilt the mast step with a number of improvements. Previously it was too far back, it sagged to leeward as the top lashing stretched, and the step at the bottom broke (mostly due to a poor glue joint).
To fix the sagging lashing, I've built a solid mast partner that sits just under the forward beam. This also moves the mast forward to just in front of the beam. This is a far forward as the mast can go, without cutting a hole in the deck and losing the forward buoyancy tank.
I've moved the mast step to the bottom of the hull. This gives the step more leverage and reduces the loads. I wasn't sure that moving the mast forward 6" would be enough, so at the moment it's only temporary - it's not painted and only held in place with screws. Also the 'keeper' block that holds the bottom of the mast in place can be moved to adjust the mast rake. In the photo there's a bit of forward rake. If this wasn't enough I'd have to have a major rethink.
In the photo you can also see where the old mast step was, the holes in the mast partner for the beam lashing, and a plastic fitting to take the down-haul and secure the rig to the boat. The mast only has to lift an inch to come out of the mast step, so I want it held in firmly.
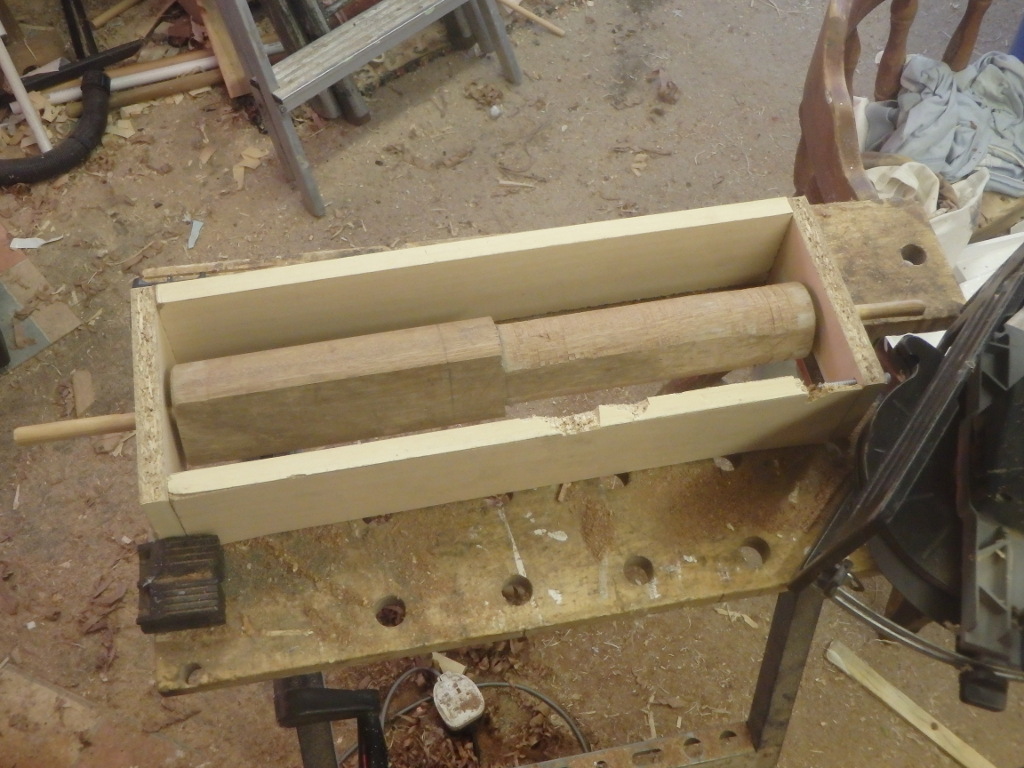
Lowering the mast step brought the boom unacceptably low, so I've extended the mast with a short piece of wood that fits inside the laser mast (Thanks to Rob Zabukovec for that idea!). Unfortunately I sold my lathe a couple of months ago, after not using it for years, so I made this box with pins to support the wood and shaped it with a circular saw - fine except when the blade snagged the edge of the box!
We tried all this at the weekend, and it's a huge improvement. We had a good force 4 and nothing broke, despite flying the ama at times and turning it into a submarine on the other tack. Best of all the weather-helm had gone - in fact there was a small amount of lee-helm, so I can reduce the mast rake.
Another innovation this time was adding a 3 meter long 110mm diameter drain pipe as a safety ama. I calculated that it's only 30liters of buoyancy, and when I tested it in the shallows it submerged pretty easily. However, once the water reached my waist the boat stabilised with the gunnel just out of the water, and once I stopped trying to tip it, it self-righted. I think it would stop us turning turtle but I'm not sure it'll always save us. And it looks ugly!
To fix the sagging lashing, I've built a solid mast partner that sits just under the forward beam. This also moves the mast forward to just in front of the beam. This is a far forward as the mast can go, without cutting a hole in the deck and losing the forward buoyancy tank.
I've moved the mast step to the bottom of the hull. This gives the step more leverage and reduces the loads. I wasn't sure that moving the mast forward 6" would be enough, so at the moment it's only temporary - it's not painted and only held in place with screws. Also the 'keeper' block that holds the bottom of the mast in place can be moved to adjust the mast rake. In the photo there's a bit of forward rake. If this wasn't enough I'd have to have a major rethink.
In the photo you can also see where the old mast step was, the holes in the mast partner for the beam lashing, and a plastic fitting to take the down-haul and secure the rig to the boat. The mast only has to lift an inch to come out of the mast step, so I want it held in firmly.
Lowering the mast step brought the boom unacceptably low, so I've extended the mast with a short piece of wood that fits inside the laser mast (Thanks to Rob Zabukovec for that idea!). Unfortunately I sold my lathe a couple of months ago, after not using it for years, so I made this box with pins to support the wood and shaped it with a circular saw - fine except when the blade snagged the edge of the box!
We tried all this at the weekend, and it's a huge improvement. We had a good force 4 and nothing broke, despite flying the ama at times and turning it into a submarine on the other tack. Best of all the weather-helm had gone - in fact there was a small amount of lee-helm, so I can reduce the mast rake.
Another innovation this time was adding a 3 meter long 110mm diameter drain pipe as a safety ama. I calculated that it's only 30liters of buoyancy, and when I tested it in the shallows it submerged pretty easily. However, once the water reached my waist the boat stabilised with the gunnel just out of the water, and once I stopped trying to tip it, it self-righted. I think it would stop us turning turtle but I'm not sure it'll always save us. And it looks ugly!
Tuesday, 4 August 2015
Mast step failure
I need to rethink my mast step - or work out what I did wrong the first time. Here's a photo looking down into the boat at what's left of the mast step. There used to be a square block with a hole in the middle, where the paint is missing. It came unstuck, the two 12mm belaying pins held it all together for a surprising length of time, and then the block split.
Here's the remains of the glue joint, it looks like the wood had been coated in wax or oil because the epoxy hadn't stuck very well.
Lashing the mast to the beam wasn't really satisfactory either, as the lashing stretched the mast would lean to leeward, and I think that added to the forces turning the boat into the wind. I plan to make a solid mast partner, glued to the forward bulkhead, and extend the mast about 6" so I can move the mast foot down to the chine battens.
Here's the remains of the glue joint, it looks like the wood had been coated in wax or oil because the epoxy hadn't stuck very well.
Lashing the mast to the beam wasn't really satisfactory either, as the lashing stretched the mast would lean to leeward, and I think that added to the forces turning the boat into the wind. I plan to make a solid mast partner, glued to the forward bulkhead, and extend the mast about 6" so I can move the mast foot down to the chine battens.
Sunday, 2 August 2015
Sailing at last!
This was actually our second outing, as we forgot the camera the first time. We're using a laser rig, with the mast lashed to the forward beam and the foot of the mast resting on a step about halfway up the hull. There's no rudder yet, so we're relying on a paddle and moving our weight around to steer. It's not quite balanced like this, the rig is a little far forward which is why we're all sitting at the back. Even so, with three of us on board we were matching the lasers, and it only needed one of us to sit on the hiking bench for balance.
We took a friend and his children out briefly, the extra weight didn't seem to make much difference, although it's getting pretty low in the water.
Saturday, 25 July 2015
Painting and trial assembly
I've spent the last couple of weeks painting, initially very slowly with a brush and then much faster with a small foam roller. The white is ordinary exterior gloss, and seems very soft at the moment. The wood colour is International Woodskin - a wood stain with a slight gloss finish. I've not yet done the full three coats but where I have I can see that each coat looks shinier than the last.
I'm very happy that I was persuaded not to just paint it all white, I love how it looks.
Here are all the pieces before and after assembly.
Doing up the bolts on the ama is fiddly and slow. The main hull isn't so bad but the rocker means that they don't naturally line up and I needed a helper to lift one bow.
Oh, there's also a trolley made from a cut down Optimist trolley. The kids had a lot of fun pushing each other around on it!
I'm very happy that I was persuaded not to just paint it all white, I love how it looks.
Here are all the pieces before and after assembly.
Doing up the bolts on the ama is fiddly and slow. The main hull isn't so bad but the rocker means that they don't naturally line up and I needed a helper to lift one bow.
Oh, there's also a trolley made from a cut down Optimist trolley. The kids had a lot of fun pushing each other around on it!
Friday, 3 July 2015
Laminating the beams
Many thanks to Mr W. the Design and Technology teacher at the girl's secondary school, who helped me saw two very large straight beams into a pile of long bendy strips - now I'm gluing the strips back together in a (hopefully) graceful curve. These will link the main hull to the float.
Everything else is this build has been fair easy for an amateur builder, but sawing three inch thick planks requires more than hand-tools!
Work is still going very slowly due to family pressures, and the start of the sailing season, but we have managed to replace the foredeck and patch another rotten hole in the hull of our Miracle dinghy and give it a coat of paint and varnish so it's looking better than I've ever seen it before. Kathy and I even got to sail it last week.
Sunday, 12 April 2015
Ama, decks and a start to fibre glassing
It's been a while since I wrote anything, work has slowed down due to family commitments but I have managed to finish most of the wood work (just the beams and foils to go). Here are the two parts of the ama (float), with the edges sealed with epoxy - it's amazing how much soaks into the end grain of this plywood.
I've sealed the inside the watertight compartments with a layer of epoxy, after an enquiry on ProaForum was answered by the designer suggesting this method. I had delayed fitting the decks because I wasn't sure what to do and didn't want them to rot as badly as our old Miracle did. Now the decks and seats are on, it looks a lot more like a boat.
Here's another step I had been delaying - my first attempt at covering ply with glass cloth and epoxy. It wasn't as nearly bad as I had expected, the cloth stuck easily to the wood, didn't pull out of shape and I didn't have much trouble with air bubbles.

Sunday, 1 February 2015
Stems, seats and starting the Ama
I've added the external stems and shaped them into satisfying curves, and filled in the fiddly gap where the gunnel meets the stem. Both hulls now have a base panel, with nice rounded edges and nails punched so they're no longer proud of the surface.
Seats and supports at the blunt end of each hull.
Starting work on the Ama. There are eight long strips of ply and eight chine strips - this would go faster if I had more clamps and more space, or if it was warmer and the epoxy took less than 24 hours to set.
Sunday, 18 January 2015
Building Gary Dierking's Wa'apa in Sussex
I'm building Gary Dierking's Wa'apa outrigger sailing canoe from the plans in his book. The best thing about this design is that it is made in sections that fit in my garage!
Bulkheads and sides cut out
Framing the bulkheads
Trial assembly of the pieces, and checking to see if our girls fit
Learning to use a plane
Two boat shaped pieces
Subscribe to:
Posts (Atom)